前回、Kerasを使ってTensorFlowの学習済みモデルをRaspberry Piで動かすとあまりにも遅かったので、次はTensorFlow Liteでやってみようと思っていた。それでTensorFlow LiteのガイドのHosted modelsにあるInception_V3_quantのtfliteモデルをがんばって動かしてみたら、何と1フレーム当たりの処理時間は、TensorFlowのモデルと全く変わらなかった(Raspberry Pi 2 v1.2(Cortex A53)で約4.7秒)。使用したコードは後述のコードとほとんど同じなので省略する。float32の演算がint8の演算に変わるんだから当然速くなるだろうと思っていたが、今時のCPUはfloat32とint8の処理時間が同じなのか。
それでも、起動が早い(TensorFlow Liteモデルのロードまでで15秒)し、メモリ負荷が小さくてメモリ不足で落ちることが無い点については、非常に軽いのを実感した。
折角TensorFlow Liteの動かし方を確保したので、TensorFlow LiteのガイドのObject Detectionのstarter modelを動かしてみる。
●コードimport numpy as np import tensorflow as tf import cv2 interpreter = tf.lite.Interpreter(model_path="coco_ssd_mobilenet_v1_1.0_quant/detect.tflite") interpreter.allocate_tensors() input_details = interpreter.get_input_details() output_details = interpreter.get_output_details() with open('coco_ssd_mobilenet_v1_1.0_quant/labelmap.txt', 'r') as F: class_names = F.readlines() WINNAME = "Capture" FRAME_INTERVAL = 30 # msec CAPTURE_WIDTH = 1280 CAPTURE_HEIGHT = 720 CENTER_CROP_X1 = int((CAPTURE_WIDTH - CAPTURE_HEIGHT) / 2) CENTER_CROP_X2 = CAPTURE_WIDTH - CENTER_CROP_X1 DISPLAY_WIDTH = 480 DISPLAY_HEIGHT = 480 colors = ((255, 255, 0), (0, 255, 255), (128, 256, 128), (64, 192, 255), (128, 128, 255)) * 2 ret = False while ret == False: cap = cv2.VideoCapture(0) cap.set(cv2.cv.CV_CAP_PROP_FRAME_WIDTH, CAPTURE_WIDTH) cap.set(cv2.cv.CV_CAP_PROP_FRAME_HEIGHT, CAPTURE_HEIGHT) ret, img = cap.read() key = 0 while key != ord('q'): ret, img = cap.read() img = img[:, CENTER_CROP_X1:CENTER_CROP_X2] # crop center square x = cv2.resize(img, (300, 300)) # input size of coco ssd mobilenet? x = x[:, :, [2,1,0]] # BGR -> RGB x = np.expand_dims(x, axis=0) interpreter.set_tensor(input_details[0]['index'], x) interpreter.invoke() tflite_results1 = interpreter.get_tensor(output_details[0]['index']) # Locations (Top, Left, Bottom, Right) tflite_results2 = interpreter.get_tensor(output_details[1]['index']) # Classes (0=Person) tflite_results3 = interpreter.get_tensor(output_details[2]['index']) # Scores tflite_results4 = interpreter.get_tensor(output_details[3]['index']) # Number of detections img = cv2.resize(img, (DISPLAY_WIDTH, DISPLAY_HEIGHT)) for i in range(int(tflite_results4[0])): (top, left, bottom, right) = tflite_results1[0, i] * 300 class_name = class_names[tflite_results2[0, i].astype(int) + 1].rstrip() prob = tflite_results3[0, i] if prob >= 0.5: print("Location=({},{})-({},{})".format(int(left), int(top), int(right), int(bottom))) print("Class={}".format(class_name)) print("Probability={}".format(prob)) left = int(left * DISPLAY_WIDTH / 300) right = int(right * DISPLAY_WIDTH / 300) top = int(top * DISPLAY_HEIGHT / 300) bottom = int(bottom * DISPLAY_HEIGHT / 300) cv2.rectangle(img, (left, top), (right, bottom), colors[i], 1) cv2.rectangle(img, (left, top+20), (left+160, top), colors[i], cv2.cv.CV_FILLED) cv2.putText(img, "{} ({:.3f})".format(class_name, prob), (left, top+15), cv2.cv.CV_FONT_HERSHEY_SIMPLEX, 0.5, (0, 0, 0)) cv2.imshow(WINNAME, img) cv2.moveWindow(WINNAME, 0, 0) key = cv2.waitKey(FRAME_INTERVAL) if key == ord('s'): cv2.imwrite('result.jpg', img) cap.release() cv2.destroyAllWindows()
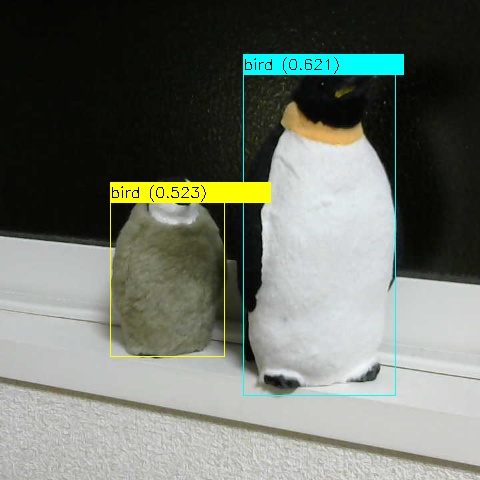
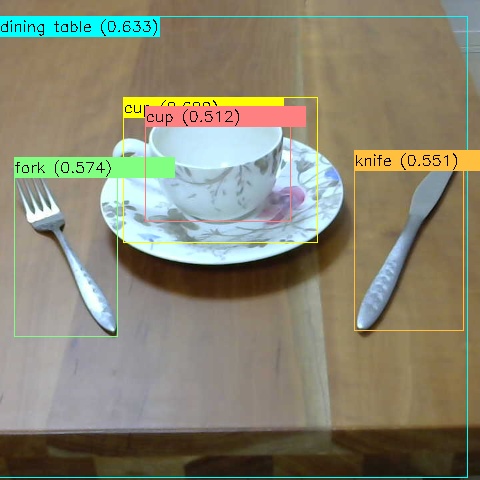
●結果(Raspberry Pi 2 + Webcam C270で実施)

このモデルには"penguin"の識別クラスが無いので、"bird"で正解である。

確信度が高い検出結果の枠とラベルが前になるよう、確信度が低い枠とラベルから順に描画するようにすれば良かった。
なお、TensorFlow公式サイトに記載されている手順でインストールしたTensorFlowだと、tf.lite.Interpreter()の呼び出しで次のようなエラーになった。
_tensorflow_wrap_interpreter_wrapper.so: undefined symbol: _ZN6tflite12tensor_utils24NeonVectorScalarMultiplyEPKaifPf
https://github.com/tensorflow/tensorflow/issues/21855を読むと、この問題は結構前からあるのにリリースを重ねても解決されていないようだ。筆者の環境では、同ページに紹介されているhttps://github.com/lhelontra/tensorflow-on-arm/releases/にあるtensorflow-1.13.1-cp27-none-linux_armv7l.whlをインストールすると、上記のエラーが解消した。
今回、TensorFlow Liteの"Get started"のページから入って、"Use a pre-trained model"の所の"Image classification"や"Object detection"の所を辿って、よし、発見!と思ったのだが、それらを使う直接的なサンプルコードがWebで1つも見つからなかったので、そこから結構苦労した。
同ページの"Run inference with the model"の所の"TensorFlow Lite interpreter"を開くとC++とJavaのサンプルコードがあるが、Pythonのが無い。唯一、"There is also a Python API for TensorFlow Lite."とあるのでリンクを辿ると、「コンバータ Python API ガイド」というページが開いて混乱した。
"Get started"のページから辿り直すのを3〜4周繰り返した後、「コンバータ Python API ガイド」のページの下の方にモデルの実行を含むサンプルコードがあるのに気付き、それに合わせ込む形で何とか成功にこぎ付けた。
しかし、"There is also a Python API for TensorFlow Lite."と、補足のように書かれているということは、TensorFlow LiteはC++やJavaで使うのが普通なのだろうか。
iOSやAndroidで使うことが多いと想定されるから、当然か。
コメント